7/26/2018

Using Nexmo to receive incoming calls


Reference
https://www.nexmo.com/blog/2017/01/26/handle-inbound-text-speech-phone-call-node-js-dr/

# Buy a virtual number

First you make a payment (with credit-card/paypal) in order to buy virtual numbers. At least 10 Euro to start.
Here I bought an Indonesia number +628557467xxxx .

# Setup a webserver to receive webhooks.

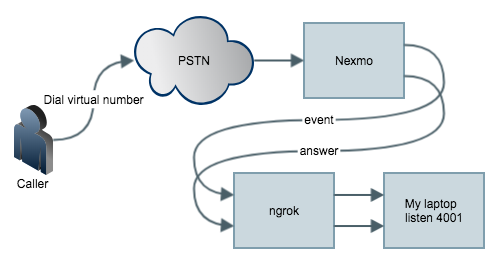
The target is When anyone (from PSTN/GSM) calls your virtual number, Nexmo platform intercepts the call and
sends it to the application you created.
To setup a web server on your laptop to listen the webhook, you can use any web framework.
For me i use CodeIgniter . Download and unzip it anywhere.
Create a controller named event.php under application/controller with the following

defined('BASEPATH') OR exit('No direct script access allowed');
class event extends CI_Controller
{
public function index()
{
var_dump($_POST);
}
}

and a answer.php like the following,

defined('BASEPATH') OR exit('No direct script access allowed');
class answer extends CI_Controller
{
public function index()
{
var_dump($_POST);
}
}

Then under the same folder, run
>php -S localhost:4001 -t ./
will start a web server listening on port 4001.
Then we setup a ngrok which is an auto registering dynamic https endpoint.
On a macOS laptop, use
>brew cask install ngrok
>ngrok http 4001
For example, you see the following:

ngrok by @inconshreveable (Ctrl+C to quit)
Session Status online
Session Expires 7 hours, 59 minutes
Version 2.2.8
Region United States (us)
Web Interface http://127.0.0.1:4040
Forwarding http://e69a8532.ngrok.io -> localhost:4001
Forwarding https://e69a8532.ngrok.io -> localhost:4001
Connections ttl opn rt1 rt5 p50 p90
0 0 0.00 0.00 0.00 0.00

Now everything is ready on your laptop.
Then we tell Nexmo to send webhook to https://e69a8532.ngrok.io

# Install nexmo command line interface
>npm install nexmo-cli -g
>npm i npm to update
>nexmo setup

Find your application id on the page.
>nexmo app:update "My First App" https://e69a8532.ngrok.io/answer https://e69a8532.ngrok.io/event
>nexmo link:app

# Testing

Call the virtual number like +628557467xxxx from your mobile phone (GSM) or Skype out
and you'll see the variable dumped in php.
[Thu Jul 26 16:41:55 2018] ::1:65010 [200]: /event
[Thu Jul 26 16:41:55 2018] ::1:65011 [200]: /event
[Thu Jul 26 16:41:56 2018] ::1:65012 [200]: /event
[Thu Jul 26 16:41:56 2018] ::1:65013 [200]: /event
[Thu Jul 26 16:42:12 2018] ::1:65017 [200]: /event
[Thu Jul 26 16:42:12 2018] ::1:65015 [200]: /event
[Thu Jul 26 16:42:13 2018] ::1:65016 [200]: /answer?to=628557467xxxx&from=4434xxxxxxxxxx&conversation_uuid=CON-xxxxxxxx-7a9e-426d-961b-828bc7726d49&uuid=93b62d17c960c0209xxxxxxxxxx

12/04/2017

Block incoming calls. How to extract offline database from Whoscall


Prepare apk and root phone
Download apk of gogolook whoscall from some website like this.

Install apk to a rooted android phone, I recommend samsung i9001.
A little bit old, but great performance running CyanogenMod. Here's how you can root your i9001

Download offline database
Update offline database following instructions in Whocall app, this will create a database named

Under android /data/data//databases/offline.realm

Use Android studio device monitor tools to navigate to above path,
Click the button (top-right) to "pull file from device"
Save it to your Download folder on your laptop, say whoscall_database

.realm is a client-side database that helps you seamless integrate a sqlitedb and scale-up if needed. Realm database help manage db when gets larger.


Download real browser from above site to your Mac laptop

Open Download/whoscall_database/offlinedb.realm

I'm using a Taiwan number so most of the database are numbers in Taiwan.


Looks like when a call comes in, whoscall is using a hash function to calculate from the phonenumber to a hash value and then search from the offline database for a hit. If so, shows a warning triangle on the lock screen. 

4/25/2017

Scaled Agile for The Enterprise

最近聽關於專案管理的podcast 很有感覺
原來專家們已經遇過要從50位RD成長100位RD的瓶頸。

當我們從scrum抽取 Agile 概念用於backlog 工作項目以及排序優先順序, 已經某種程度上已經契合 Agile的精神。

但是Business operation management layer 相當於原本PMP當中提到的PMO (Project management Office的角色,管理階層往往希望「每一項功能」在產出方面希望得到日期保證,實際上這是waterfall的精神。

這兩種方法在原理上是衝突的。

解決方法是:

1. 經常溝通或教育PMO認知到為何Agile比較快deliver一些feature到客戶手上、修改對於壓日期的「預期心理」。PMO鎖定策略面就好,缺點是可能因為策略不明導致下一round的Agile process卡輪。

2. CEO直接頒布本公司採用Agile 方法,會比較硬性而且大家需要學習Agile的名詞與方法。
12相比第一是靠潛移默化我覺得比較好。


3. 如果研發的throughput 要再scale上去的話、可能需要建立中間整合層的人,有幾種方法學像是leSS, nexus。 不過我還沒有學習過相關的framework以及管理技能, 研究之後再分享。

2/25/2016

架設公司私有的Yum repository for CentOS 7


開始之前先瞭解一下世界上的軟件庫, 以及注意事項:

$yum -y install yum-utils httpd createrepo rsync reposync wget

根據公司的需要, 我們要同步CentOS 7 以及EPEL的Repo, Architect是採用x86_64 因此不需要i386的部分.
硬碟規劃約保留300GB

httpd是為了架設網站, 開放port 80 給公司的辦公室網域 以及RD開發區, SAT測試區, BETA區以及上線區域
reposync - used to synchronize remote yum repositories to a local directory, using yum to retrieve the packages
createrepo - Create repomd (xml-rpm-metadata) repository

0. 在/var/www/html/ 創建好規劃的目錄結構

在開始之前可以找一個離自己最快的yum repo, 因為我的mirror是架設在東京的AWS, 可能找日本的mirror會快很多.
找速度較快而且支援rsync的mirror site, 以我的例子是找到 mirror.fairway.ne.jp
$vi /etc/yum/pluginconf.d/fastestmirror.conf
修改成為這行: exclude=.gov, facebook, mirror.slowmirror.com

1. 對於centos,使用命令:

建立結構
$mkdir -p /var/www/html/yum/centos/7/os/x86_64
$mkdir -p /var/www/html/yum/centos/7/updates/x86_64
$mkdir -p /var/www/html/yum/centos/7/extras/x86_64

開始同步CentOS
$rsync -avrt rsync://mirror.fairway.ne.jp/centos/7/os/x86_64/ /var/www/html/yum/centos/7/os/x86_64/ &

結束之後安裝yum-arch進行RPM分析,並在目錄下產生headers資料夾
$wget ftp://rpmfind.net/linux/epel/6/ppc64/yum-arch-2.2.2-9.el6.noarch.rpm
$rpm -ivh yum-arch-2.2.2-9.el6.noarch.rpm
$yum-arch /var/www/html/yum/centos/7/os/x86_64
$yum-arch /var/www/html/yum/centos/7/updates/x86_64
$yum-arch /var/www/html/yum/centos/7/extras/x86_64

對64-bit packages目錄產生repodata資料夾
$createrepo /var/www/html/yum/centos/7/os/x86_64
$createrepo /var/www/html/yum/centos/7/updates/x86_64
$createrepo /var/www/html/yum/centos/7/extras/x86_64

2. 對於RHEL部分:

我使用reposync 這個工具, 先執行指令確認自己所屬的repo
$yum repolist

reposync 在執行的時候如果要用背景 & , 記得要用 nohup, 避免人離開去休息的時候, 一旦關閉terminal 就停止了
$reposync --repoid=epel --arch=x86_64 --gpgcheck -l --download_path=/var/www/html/
$reposync --repoid=base --arch=x86_64 --gpgcheck -l --download_path=/var/www/html/
$reposync --repoid=extras --arch=x86_64 --gpgcheck -l --download_path=/var/www/html/
$reposync --repoid=updates --arch=x86_64 --gpgcheck -l --download_path=/var/www/html/

The above command will download the packages in the mentioned download path. You then need to run following command to create the repository:
$cd /var/www/html/
$createrepo -v /var/www/html/

3.針對webstatic 的部分 Webtatic EL7 for CentOS/RHEL 7:


之後輸入
$yum repolist
會看到多了webtatic 這個repoid (我們就放寬不檢查GPG key了, 以免沒抓到)
$reposync --repoid=webtatic --arch=x86_64 --download_path=/var/www/html/

再做一次createrepo
$createrepo -v /var/www/html/

4. 開放firewall 給 80 port
$firewall-cmd --zone=public --add-port=80/tcp --permanent
$firewall-cmd --reload
$systemctl enable httpd

參考文獻:

-  How to create a local mirror of the latest update for Red Hat Enterprise Linux 5, 6, 7 without using Satellite server? https://access.redhat.com/solutions/23016